In this tutorial, I will be taking the Pong demo from Week 3 of class and will be changing the paddle to be keyboard-controlled instead of mouse-controlled.
1. First let’s talk about the Keyboard class. “The Keyboard class is used to build an interface that can be controlled by a user with a standard keyboard. You can use the methods and properties of the Keyboard class without using a constructor. The properties of the Keyboard class are constants representing the keys that are most commonly used to control games.” (
Action Script 3.0 Language and Components Reference).
2. Make a new folder called “keyboard demo”. Create a new ActionScript 3.0 FLA file in Flash and save it in the folder as “keyboard.fla”. Create a new AS file and save it in the folder as “MoveWithKeys.as”. Give keyboard.fla the class “MoveWithKeys” .
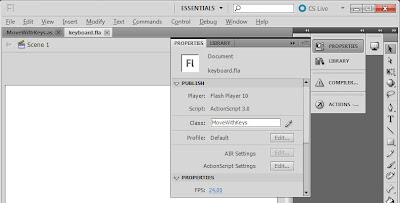
3. Now let’s get a paddle to move. Create a paddle on the stage and make it into a movie clip, or copy the paddle from m3_pong.fla’s library and paste it into keyboard.fla’s library. Here you can see the paddle movieclip in my library.

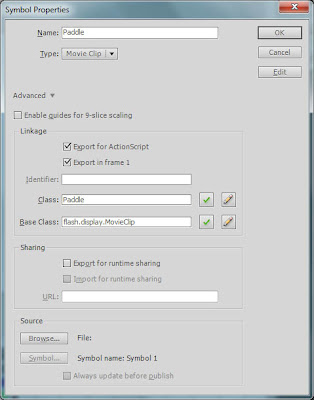
4. Instead of storing the paddle on the stage, let’s make it into a class that can be called dynamically into our application. Check the box to “Export for ActionScript”. Here’s my symbol properties for the Paddle class:
5. Add an instance of the paddle in the Actions for keyboard.fla. Here is my code:

6. Now let’s work on the MoveWithKeys class. For our class, we will need to import parts of the Flash ui into our package: flash.display.MovieClip, flash.events.KeyboardEvent and flash.ui.Keyboard. Let’s just get all Flash events while we’re at it, too, in case we need them later.

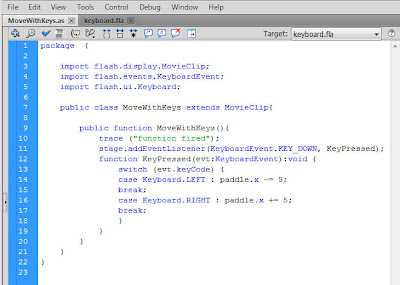
7. Here is the rest of the code, which I adapted from the Adobe help site.
7a. You can specify how many pixels to move the paddle. “ -= 5” will subtract its position on the stage by 5, and “+= 5” will add to its position on the stage by 5.
7b. switch and break statements are similar to if/else statements. If the conditions of switch are true, the code will be executed until the break.
7c. The evt is an instance of the keyboard event that was created when the key is pressed. You can use any name you want in the place of evt. The colon and the word “KeyboardEvent” indicate the type of event. “event” would also work; “evt” is commonly used because it is not a reserved word in Flash.
8. Save and test keyboard.fla. Output will show our trace message “function fired”, and you can now move the paddle left and right with the arrow keys on your keyboard!
9. Now to put this to use in our pong file. Copy your m3_pong file and paste it into the keyboard demo folder. I renamed mine “m3_pong_keyboard.fla”. I copied my paddle class from keyboard.fla and pasted it into the library of m3_pong_keyboard.fla and removed the paddle instance from the stage. Assign the document the class “MoveWithKeys”.
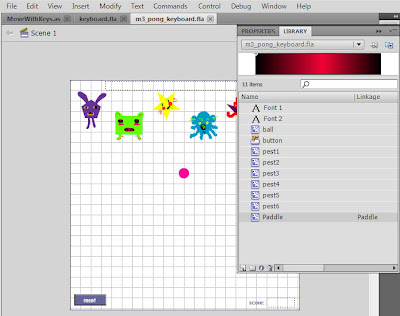
10. We don’t need the code for the paddlePressHandler or paddleReleaseHandler anymore, so rip all reference to those out of the Actions, and add in our new paddle code. I positioned my paddle a little higher than in the keyboard.fla test so that it wouldn’t hit the reset button or the score area. Don’t forget to remove the references to paddlePressHandler and paddleReleaseHandler at the bottom of the Actions code, too.
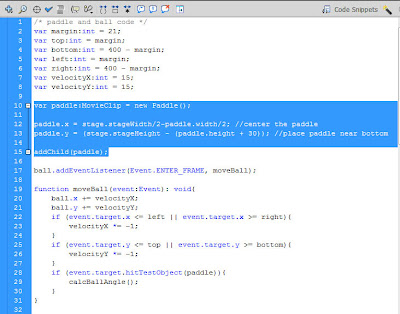
11. Test to make sure everything is working! You should now have a pong game where you control the paddle with the LEFT and RIGHT arrow keys. If it moves too slowly for your taste, increase the value of “case KEYBOARD.LEFT paddle.x “ and “case KEYBOARD.RIGHT paddle.x”.
12. Notes:
12a. KEYBOARD.UP and KEYBOARD.DOWN are also commonly used.


